How to Load MPT Calibrations onto the nGauge
- Choosing a selection results in a full page refresh.

Step 1 – Once you receive the email from MPT with your MPT tune attached, save the MPT tune to your computer in a place you will remember. Make a new folder in your documents to give a permanent location to keep your file. 
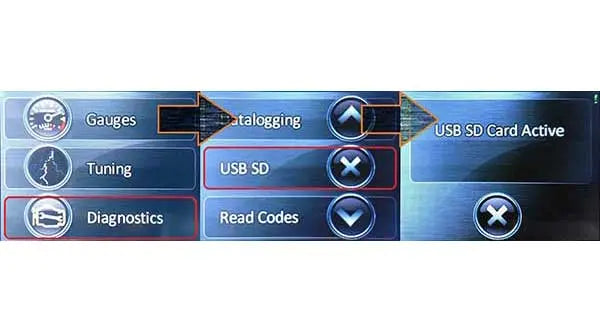
Step 2a – Mini-USB Cable - After the calibration has been saved to your computer, plug your nGauge into the PC using a Mini-USB cable. When the nGauge powers on, select “Diagnostics” from the main menu, then select “USB SD”.

Step 2b - MicroSD Adapter - If you prefer to eject the MicroSD card and use a card reader to transfer files, use the wide-end of the included stylus to eject the microSD card, then plug it into your card reader.

Step 3 – Once the USB (or MicroSD card) is plugged into the PC, your computer will prompt you to “Open folder to view files.” Select that option.

Step 4 – A file window will open up, this will display the contents of the nGauge. Select “custom files” to open it.

Step 5 – Open the folder containing your MPT Calibration, as well as your nGauge “custom files” folder. Right-click the Calibration file you want to save to your nGauge, then select “COPY”.

Step 6 – In your nGauge “custom files” folder, just right click in the empty space of the window and select “PASTE.” This will save the calibration into your nGauge’s “custom files” folder. Alternatively, you can click-and-hold the file, then drag-and-drop it into the “custom files” folder on the nGauge.

Step 7 – Next you will disconnect the nGauge to take it to your vehicle to install the calibration. To disconnect the nGauge, just tap the (X) at the bottom of the nGauge’s USB SD Card Active screen. Go ahead and unplug the nGauge from the computer at this point.
Thanks for subscribing!
This email has been registered!