


MPT's RTD Laptop Based Quick Start Guide
Contents:
Getting Started with the RTD
Reading the Stock File
If you plan on data logging, do this now
Requesting your MPT Tunes
Loading the MPT Tune
Datalogging MPT Tunes
Diagnostic Trouble Codes
Correcting Speedometer with RTD
On a Windows Laptop, start by installing RTD Flasher and VCM Suite Beta.
HP Tuners RTD flasher
[Used to Save Stock and Load MPT Tunes]https://files.hptuners.com/rtd flasher/rtd flasher.msi
HP Tuners VCM Suite BETA
[Contains VCM Scanner - Used to Data Log]https://files.hptuners.com/VCM Suite/VCM Suite (Beta).msi
Reading the Stock Tune File
This saves a copy of your vehicle’s stock file, which can take up to 20 minutes depending on the model vehicle and its file size. You’ll need an internet connection.
Note: Turn off or disconnect unnecessary electronics (lights, A/C, stereo, radar detector, etc).
- Connect the RTD to your computer and open RTD Flasher.
- From the Help menu, select Resync Interface.
• If you have issues syncing the RTD with your computer, install the drivers manually. The drivers can be found HERE or on the USB memory stick provided with the RTD, using the file named "CDM21228_Setup". - Keeping the RTD connected to the computer, connect RTD to the vehicle’s ODBII port under the dash.
- Set vehicle to KEY ON - ENGINE OFF. If you have push-button start, press the start button while your foot is off the brake pedal.
- In RTD Flasher, Click the Chip with the Green Arrow Pointing Up.

- Vehicle Reader will appear.
- Select Gather Info.
- Once info is displayed, select Read
• Note: If the vehicle has an ECU and TCU, you may be asked to cycle the power in between the ECU and TCU hardware read.

- When read is complete, save the file to your computer, you will attach this file while completing the MPT Tune Form.
If you plan on data logging, do this now.
Using VCM Scanner Beta, we need to connect and disconnect from the vehicle while stock to establish the correct Vehicle Logging Profile.
- Connect RTD to your computer’s USB and the vehicle’s OBDII.
- Open VCM Scanner Beta. Review Beta Software Warning, and click OK.
- Set vehicle to KEY ON - ENGINE OFF. If you have push-button start, press the start button while your foot is off the brake pedal.
- At the top, click the Blue Vehicle to Connect To Vehicle.

- No log required, click the Black Vehicle to disconnect.
• If prompted to update firmware, allow the update to install then press OK to continue, then re-connect to vehicle.
Requesting your MPT Tunes
Complete the MPT Tune Form
This will send MPT your stock file and give MPT the specifications to build your tune.
The next step is to wait for your MPT Tunes to arrive in your email. Normal turnaround time is around 3 business days from the day we have everything required
Loading the MPT Tune
Once you receive your MPT Tune, save to your computer. A common mistake is trying to open this file. Save and proceed.
To install an MPT tune, you will need the RTD, your computer and the MPT Tune File.
Note: Turn off or disconnect unnecessary electronics (lights, A/C, stereo, radar detector, etc).
- Connect the RTD to your computer’s USB and the vehicle’s OBDII port.
- Open RTD Flasher.
- Select File, then Open.
- Browse to where you saved your MPT Tune and select it.
- Set vehicle to KEY ON - ENGINE OFF. If you have push-button start, press the start button while your foot is off the brake pedal.
- Click the Chip with the Red Arrow Pointing Down (Write Vehicle Button).

- This will prompt an Unlicensed File window.

- Select Show License Options
(If no credits available, go to the Help menu and Resync Interface) - Change the selection to “Specific” under each controller.
•Note: most vehicles will have only one controller, some 10R80 trucks will show two.

- Press OK. This will take you to Vehicle Writer.

- Confirm Write Entire is selected. If it says Write Calibration, change it to Write Entire. (This is important.)
- Select Write. This will take 2-8 minutes.

- When it’s done writing, turn the key off and then back on and click OK as prompted.
Datalogging MPT Tunes
HP Tuners VCM Suite BETA
[Contains VCM Scanner - Used to Data Log]
https://files.hptuners.com/VCM Suite/VCM Suite (Beta).msi
If logging with an RTD/MPVI using the laptop method with the HP Tuners VCM Scanner Beta software, MPT can provide a preset list of channels to log with. For the fastest turnaround, reply to the email containing your tunes and request this file.
- Connect RTD to your computer’s USB and the vehicle’s OBDII.
- Open VCM Scanner Beta. Review Beta Software Warning, and click OK.
- On the left, click the Folder with a Sprocket on it and select Open Channel Config.

- Browse to where you saved the MPT Data Log channels XML file.
•This file was attached in the email with the MPT Tune. - If the vehicle is not already running, start it.
- At the top, click the Blue Vehicle to Connect To Vehicle.
- To start the datalog recording press the Red Record button.
•If prompted to update firmware, allow the update to install then press OK to continue. - To Stop, press the Blue Stop button.
- To save your datalog, go to the Log File menu and select “Save Log File As”
•In the file name include the name of the tune (93PRX, 91PerfTow), tune version (v1, v2, etc), and type of log (3rdgearWOT, idle, quarter-mile) Example: 93PRX-v1-quartermile.hpl

Types of Data Logs
If working with a calibrator, you will likely have specific instructions on what log to record.
- Issue Capture - If you have something specific you are contacting us about, something specific you want reviewed, that specific event is what to record.
- 3rd Gear WOT - Use M driving mode to lock in 3rd gear, Go wide open throttle from 2,000-6,000 RPMS. Do not stop log until the vehicle comes to a complete stop.
- Quarter-Mile - From a stop, floor it and capture Wide Open Throttle shifting. Do not stop log until the vehicle comes to a complete stop.
Closed course such as drag strip recommended for recording high speed data logs. It is assumed by MPT that all vehicles being programmed are in good working condition and have been reviewed by the customer to ensure that they are capable of handling additional power and performance. It is the customer's responsibility to ensure this is true.
MPT will not be held responsible for improper, unsafe, reckless, or careless driving of vehicles after installing any of our products. We do not encourage the breaking of any State or Federal Laws.
Diagnostic Trouble Codes (DTCs)
VCM Scanner can be used to read DTCs, just connect to the vehicle, click the button that looks like a check engine light. Not available while datalogging.
Correcting Speedometer with the RTD
The HP Tuners RTD has the ability to correct the speedometer for tire / wheel size and axle / gear ratio changes.
NOTE: This function is currently not yet available for 2024-2025 models. It is in development.
- Connect RTD to your computer’s USB and the vehicle’s OBDII.
- Open VCM Scanner Beta. Review Beta Software Warning, and click OK.
- Set vehicle to Key On - Engine Off. If you have push-button start, press the start button while your foot is off the brake pedal.
- At the top, click Blue Vehicle to Connect To Vehicle.
- Once connected, click the Controls and Special Functions Button (green power button).
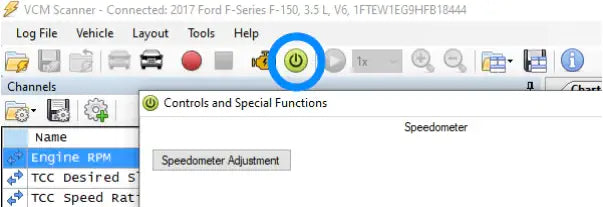
-
If new window is blank after clicking Controls and Special Functions Button, follow these steps:
- Confirm VCM Scanner Program is up to date by selecting Help and then, About in the upper left of the VCM Scanner window. Update, if not current.
- Obtain Strategy / Operating System codes for ECM and TCM.
To do this:
• Open RTD Flasher.
• Open the "Return-To-Stock.rtd" file MPT provided you.
• Select Edit in upper left of window and then, select Calibration Details.
• Copy or write down Operating System code for ECM and TCM (ECM will be on top).
• Close Calibration Details Window and close RTD Flash Program. - Return VCM Scanner Program.
- Resync RTD.
- Select Vehicle in upper left. Select Vehicle Profiles and then, Vehicle Profile Editor.
- Enter Strategy / Operating System codes for Engine (ECM) and Transmission (TCM) in respective User OS space.
- Close Vehicle Profile Editor Window.
- Connect to vehicle.
- Try Controls and Special Functions Button again.
- With populated window, click Speedometer tab, at the top of the window.
- Click Speedometer Adjustment Button.
• Note: Take a picture with your phone or write down what the default gear ratio and rev per mile is before setting each value. - Input Gear Ratio, if changed and hit OK.
• If not being changed, enter current gear ratio

- Input Tire Revs Per Mile value, if changed, and click OK
• If not being changed, enter current revs per mile value

- VCM Scanner will confirm adjustment is successful.

- Turn key off and you can exit VCM Scanner.
- Choosing a selection results in a full page refresh.